Archive for the ‘Learning Aids’ Category

A Journey into Manipulatives Part 1

For the first time that I can remember, I am in an appraisal process that is aimed at both my development as a teacher and as part of a department.  Three specific appraisal targets which I’m really excited to get my teeth into.  The plan is to blog about all of these, but one target at a time…

So firstly, my second target is to develop the use of manipulatives in my teaching and to share these strategies with the department. There is a particular focus with my lower prior attaining year 8 group, but not restricted to just this group.

Prior to this year, I’ve started introducing myself to the use of manipulatives with the following:

  • Attending a workshop from Johnny Hall @studymaths on the use of double sided counters, including his amazing mathsbot.com websiteVisible Maths.png
  • Attending a workshop from Bernie Westacott @berniewestacott on the use of double sided counters
  • Attending a workshop from Peter Mattock @MrMattock about division, and the use of cuisinere rods
  • Dipping into Pete’s book Visible Maths (the negative numbers part so far) Teaching for Mastery
  • Attending a workshop on manipulatives and their representations exploring algebra tiles
  • Reading Mark McCourt’s @emathsuk book Teaching for Mastery – a huge influence on how I approached and presented
  • Attending a workshop from Dr Liz Henning on the use of manipulatives to deepen conceptual understanding (see notes here)

Double Sided Counters

Amazon Double sided counters.png
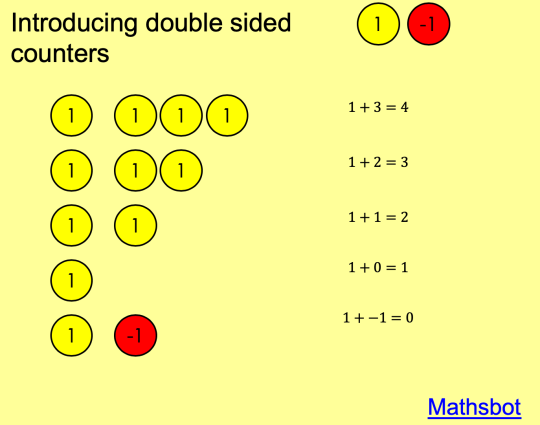
From these, I have made use of double sided counters when teaching negative numbers.  To begin with, I printed out some squares, with a yellow 1 on one side and and red -1 on the other side.  A bit fiddly, but did the job as I introduced negative pairs and adding and subtracting with negative numbers.  I’ve since upgraded to actual double sided counters (Amazon – 2 packs of 120, so 16 sets of 15 for classroom use).

So to the actual lessons and use of the double sided counters.  The learning plan goes like this:

  • Use of number line with negatives as starting points or ending points
  • Context questions
  • Introduce double sided counters
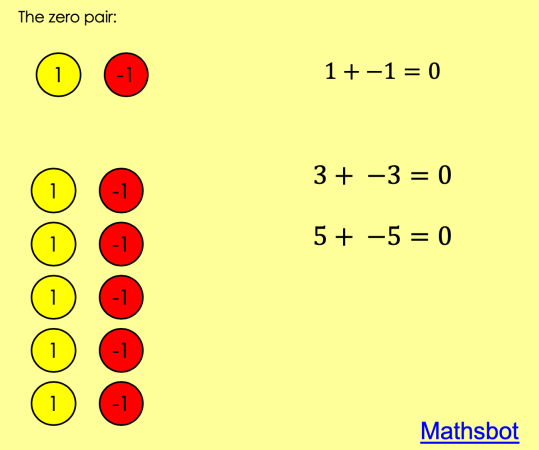
Introducing double sided counters
  • Zero pairThe zero pair
  • Playing with counters
  • Adding a negative and seeing result
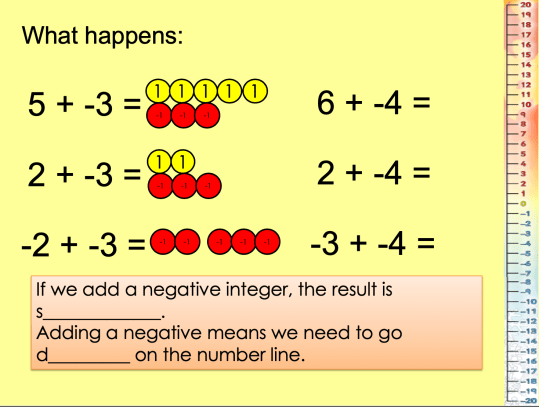
Adding a negative
  • Quick questions
  • Subtracting a negative and seeing result
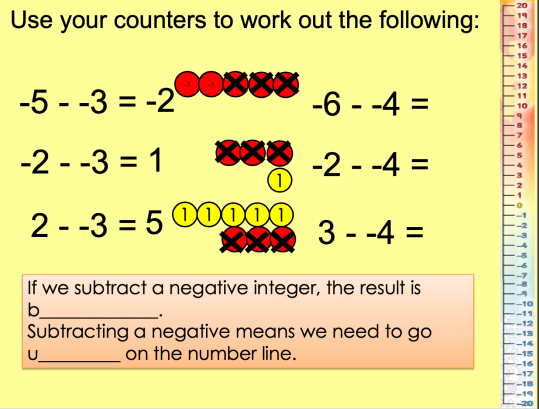
Subtracting a negative
  • Quick questions
  • Mixture of adding and subtracting negative numbers (for some groups I used these questions from variationtheory.com

The powerpoint I made is here: Add and subtract negative numbers.  You’ll have noticed the mathsbot.com links – there was lots of talk and playing, with demonstrations using Johnny’s site.

I am still looking to improve and refine, but so far the students appeared to make sense of what was happening.  Ideally, I would have liked more time, as always!  My year 8 group used the counters to help with the questions, whilst there was a mixture from my year 7 groups.  The higher attaining students, who had learned shortcut rules previously, wanted to just use “the rules”.  For other students, some fell back on these rules, whilst others were writing out the R and Y to help them.


GCSE Foundation Maths Folders

In September 2015 I inherited a foundation year 11 class.  The class had previously had low achievement levels and included a few pupils (at least 50% if I remember correctly) with SEN. We struggled during the first half term, particularly with getting maths notes and examples written in books.  I was printing out an awful lot of write on worksheets and gluing them into books.  I then read @mathsjem’s post on resourceaholic.com about her foundation group in which she wrote about the folders she used to organise their work and study packs for each lesson.  See her updates on this here and here.  I thought this would be an ideal way of working with my year 11 group, particularly in supporting their note taking, so many thanks to Jo for introducing me to this plan.

The ring binders were such a fab idea, and it just so happened that at the very point I was thinking about this, a friends workplace were closing down and skipping a load of lever arch ringbinders, which she kindly collected for me.  Perfect!

Two years on, and it appeared so successful after the first year, that I repeated it last year with a similar year 11 group.

I’ve added a page with the folder sheets I have used over the last couple of years.  I’ll admit I’m quite anxious about putting them all on as I know I’ve used resources that others have kindly shared.  I’ve gone through and deleted resources that are from subscription or prominent sites. I’ve linked to TES resources I’ve used from there, but I’m still worried I’ve missed something that someone else took their time to create, so please accept apologies in advance and let me know if I need to credit you.

The first benefit of the folders is the organisation of the students work.  We had 5 sections: Classwork, Homework, Assessments, Practice Papers and BBQs (more on those later!). It’s great to sling the assessments and past papers into after the follow up work.

Sheet headingFor the classwork, I prepared a page, usually double sided, for each lesson, with the learning question already written on.  I also decided to number the sheets with unit and lesson number on!

The real bonus of these sheets is that notes can be laid out for better referral back to them, and all the questions are already on there, so no glueing in! They tended to get a pattern of boxes for facts and speech bubbles to annotate examples.

Although it took time to make these sheets, these were the resource for the lesson.  I didn’t make a powerpoint to go with them, as I used the visualiser I was lucky to have in my classroom.  It wasn’t just a “copy these notes down”; as I was filling them in the same time as the students, it was all about the questioning too.

The BBQs are my starters I use.  They stand for bread and butter questions; I first used Just Math’s bread and butter questions here, but then I wanted to use certain questions for my group, so developed my own. At the start of the year, I chose a selection of questions and then for four lessons in a row they would do the same set of questions (different numbers!).  However, once we started doing papers, whether in class or for homework, I would choose mostly fluency questions which most of the class had got wrong, so the first session has more guided questions and then the next 3 would allow for further practice on these areas.  Next job is to upload these!

img_0897.jpg

I would totally recommend using folders for GCSE work.  I would imagine if I were to do these with a higher foundation group, or a higher group, then I would leave more blank spaces for the students to make their notes, rather than the prescriptive layout I’ve been using with the groups I’ve had.

Two Lessons, Two Year Groups: Translation and BIDMAS

The final #MTBoS blogging challenge is about a lesson taught this week.  I couldn’t decide between two of them, so thought I’d write about both, being two quite contrasting groups.  Firstly,  year 10 (14-15 year olds), who find maths quite challenging and haven’t had much success in their achievement over the years, but are working extremely hard and hopefully becoming more confident, learning about translation and then year 7 (11-12 year olds) learning order of operations, a group full of high achieving pupils.

mylesson

Both lessons started in exactly the same way, with the brilliant Numeracy Ninjas by @maths_master William Emeny (greatmathsteachingideas). I do some sort mental arithmetic or skills practice at the start of every lesson, as not only does it set the routine for the pupils, it settles them into thinking right from the start of the lesson, and ensures their numeracy skills are regularly practised to support with the fluency when tackling tougher topics. For the year 10s, they are focussing on the first two sections, mental numeracy and timestables, whereas year 7 whizz through these two sections and focus on the key skills section. We then pick out a question that pupils struggled with to review, before launcing into the topic for the lesson.

Year 10 Translation

I knew when planning this lesson that the year 10 group studied translation last year, so they should know what it is.  However, they wouldn’t have used vectors before, so this was the focus of the lesson.

image

We started with a quick reminder of translation, then headed straight into what a vector was. An explanation from me, some note taking and a few vectors for the pupils to think about what they mean.
imageWe then spent a chunk of time identifying the vectors that would move the points, and then  shapes.
image
This was whole class questioning, and they weren’t allowed to use the words left, right, up or down, just the two numbers in the vector.  I, of course, threw in a question where there was only movement in one direction, and pupils discussed how they would give the vector for that. Then pupils had their own practice time in their books. As I circulated, I caught a couple of pupils writing their vector as a co-ordinate pair, and we stopped and discussed the different between a co-ordinates being a position and a vector being a movement, and therefore had to be written in the correct notation.

image    image

Once pupils were more secure in their vector writing, they then had a lovely translation activity from @just_maths (as a school we subscribe to Just Maths Online). We discussed the importance of identifying a vertex to complete the translation from, and to check they are completing the translation correctly, they could choose another vertex and repeat the translation.

And that’s it! I don’t really do bells and whistles in my lessons, I just aim to teach the pupils as best I can and give them the time and support to practise and hone their learning. In a few lessons time, we’ll be bringing all the learning on transformation together, where pupils will have to carry out or identify the correct transformation, including combinations.

Year 7 Order of Operations

Before I taught this, I knew that most, if not all, of this group would have been taught  about order of operations at primary school, so this would be a revision and stretch lesson.  I had to ensure they knew and understood the basics, but be ready to give them a bit of a challenge.image

I love foldables as an alternative to note taking, and I have a BIDMAS Foldable I created for this topic. I teach order of operations as BIDMAS, being careful to keep DM and AS on the same level.  The only sticking point was that pupils had been taught BODMAS previously.  We discussed what order and indices mean, and I explained why we use indices at secondary school (in the mathematical vocabularly they are excpected to know).

The skills practise involved 3 levels of questions. Pupils could choose the level to start at, and several went straight for the gold challenge, whereas others wanted a bit of practise on the more straightforward silver questions first.image

The challenge activity was a calculation square from Don Stewards Median website. I really liked this activiy, as it did make the pupils think.  Not only did they have to remember the order of operations, but they had to think about where to start and what each calculation was asking. Pupils who found the gold questions starightforward minutes ago, were feeling quite puzzled about this one.

imageWe finished the lesson with another Don Steward activiy, bracketed, from which I chose 5 equations for the pupils to decide if they were correct, or if they needed brackets in. Although mostly identified correctly, the biggie that came out of this was pupils thinking the 5 x 6 needed brackets in 2 + 5 x 6 = 32.

Unfortunatley I don’t have any photos of these pupil’s work as they have their books for revision!  The powerpoint is attached BIDMAS.

You can probably tell that I have go to places for resources and activities in my lessons. When there is so many quality resources around, thanks to the generosity of so many maths teachers sharing their work, there’s no point reinventing the wheel!  I do plan my lessons thinking of the outcome first, and then looking for activities which will enable this outcome for the pupils.

I hope you’ve enjoyed these lessons.  I’m looking forward to reading and being inspired by others in the #MTBoS challenge who have shared their lessons too.


Questioning

With week 3 of the #MTBoS blogging challenge we are thinking about questioning.  And this did get me thinking, as verbally I know how I question pupils, but with written questions, whether it is class work, home learning or assessment, I hadn’t reflected much on the process.  Yet as I got thinking about it, I realise I do have my particular ways, developed through experience and doing my best to read around other teacher’s practice and experience, as well as latest education news.betterquestions

Starting with verbal questioning, it’s fairly staright forward to me. I want to find out what pupils know, facts and processes, and why they know that. When working through a problem whole class, I direct questios to pupils, and different pupils will get different questions from me, depending where they are in the learning process. I might ask one pupil a closed question to see whether they can recall certain aspects, whereas another pupil I might want to elicit further understanding from them.  My favourite question is probably “why?”.

Onto classwork, I begin with the objective of the lesson and what I want students to be able to do by the end with their learning. I don’t often make up my own questions – quick practice questions I will do, but the deeper, thoughtful questions I search around my usual haunts until I find the questions which suit. We have electronic text books, so I may select questions from these, or use websites such as Don Steward’s Median, Resourceaholic, Teachitmaths (subscription) or Mathspad (subscription), and not forgetting TES resources.

I also keep in mind the SOLO taxonomy, so that the questions I give the students can develop from single knowledge questions, bringing in extra skills, through to problem solving questions, which may link to other areas of mathPlotting Graphss. Take area of shapes, for example.  Questions would start with practising using the formula to find the area of the shape, then it might be finding a length, given the area, fidning the area of compound shapes, developing through to a problem solving question, which involves other areas of maths, for example fractions.  I use a bronze, silver, gold, platinum system to identify the level of difficulty in the questions.  Bronze would start with the basics we covered in whole class work, and each new section would involve something extra the pupils would have to think about. I often give a minimum number of questions to answer from each section, depending on whether it is a totally new topic to the group or not.  The Plotting graphs example attached starts with the basic y = mx + c graphs that we worked through as a class, and develops into different forms of the equation, where pupils have to think about what the equation is saying.

Measures HL
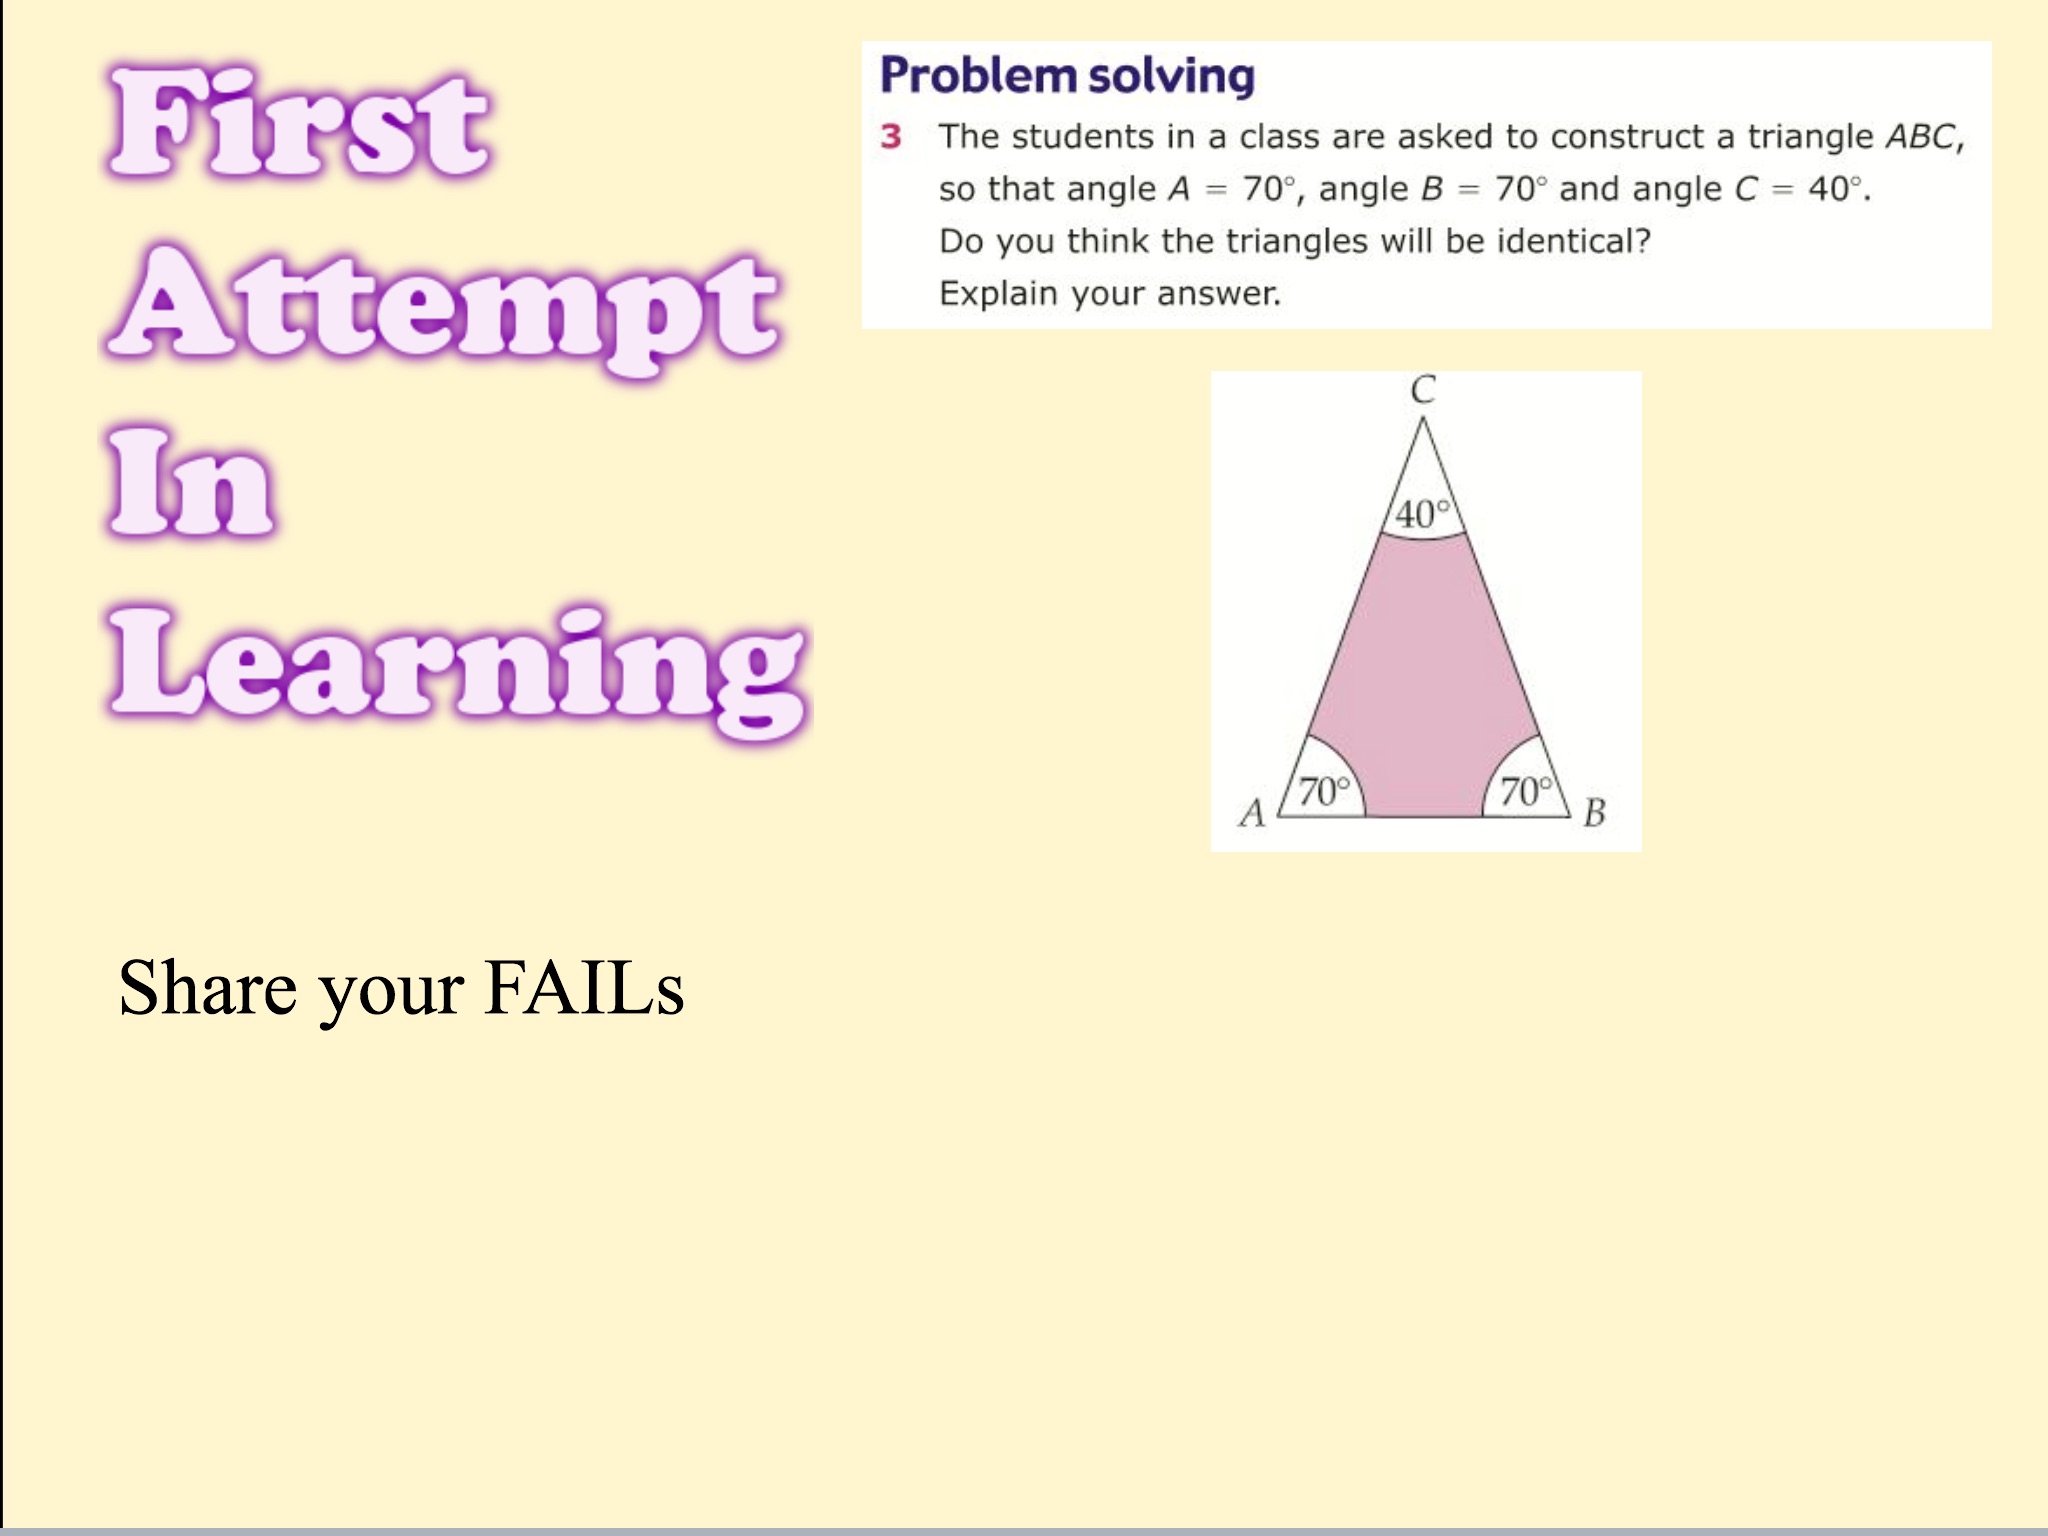
For home learning, I section my questions into the three areas of the new curriculum, fluency (I call it skills practice on the home learning), reasoning and problem solving.  There are more questions on the fluency section, as a primary focus, but I think it’s important that students are exposed to the reasoning and problem solving questions. My question choices are by no means perfect, and the reasoning and problem solving do cross over, but it’s a starting point I am developing from.  The example is a home learning for Metric and Imperial Measures.  For reasoning questions, one of @mrbartonmaths diagnostic-questions is good for pupils to explain their choice from the multiple answers on offer. These questions are carefully set by Mr Barton to help reveal misconceptions.

Finally, when it comes to assessments, for KS3 (11-13 yr olds), we have bought into a scheme that provides the assessments. With the quick change over of the curriculum, and no permanent head of department, it seemed best to start from something already written, and tweak as we go along.  And oh how I’ve tweaked.  I’m a devil for looking through assessments and thinking, that’s not what I want! I believe our end of unit assessments (a 20-30 minute assessment every 2 weeks), should be assessing what the pupils have learnt.  At a previous #mathsconf, I attended a session on assessment by @kris_boulton, which was very informative, particularly about defining the domain of what your teaching – the assessment should then cover, as much as possible, this domain.  Although teaching should focus on the domain, it isn’t restricted, so can go further.   Assessment goes in the same categorise as the home learning for me, but not explicitly split into sections. There needs to be some knowledge and skills questions, and there also needs to be the questions that use the skills in more implicit ways.

I think I have changed all my spellings of questioning, as I’m very much inclined to put a double n into the word! Please forgive any I missed!


Numeracy Picture Puzzle (Division)

Division PuzzleI came across this idea on superteacherworksheets.com, although I’m sure many others have also used or made something similar.  It’s quite straightforward, pupils complete 9 calculations, find the answers on the puzzle pieces, and put them in the same order as the questions to make a picture! So I made this one for the decimal division that one of my groups is currently working on.

I don’t give the scissors out until the questions have been attempted (as otherwise pupils can easily put the puzzle together!)  The bonus of having the pieces with the answers on is that pupils can self-check as they are working.  There is no reason for the cutting and putting together of the puzzle, other than it is a motivating factor to complete all the questions, giving the pupils well needed practice!

Decimal Division Puzzle

Speed Dating with Fractions, Percentages and Decimals

When preparing a resource to take and share at mathsconf4, I wanted to share something which I find valuable and seems to make a difference to pupils learning. So I chose a resource, originally from TES (complex_number) for a topic I find pupils struggle with, yet is a basis for so much mathematics: converting between fractions, decimals and percentages. The resources I use are for groups with little or no understanding of the connections between the three as they start off quite basic.

It starts with a slideshow of artwork where proportions could be viewed as a theme. IMG_0337
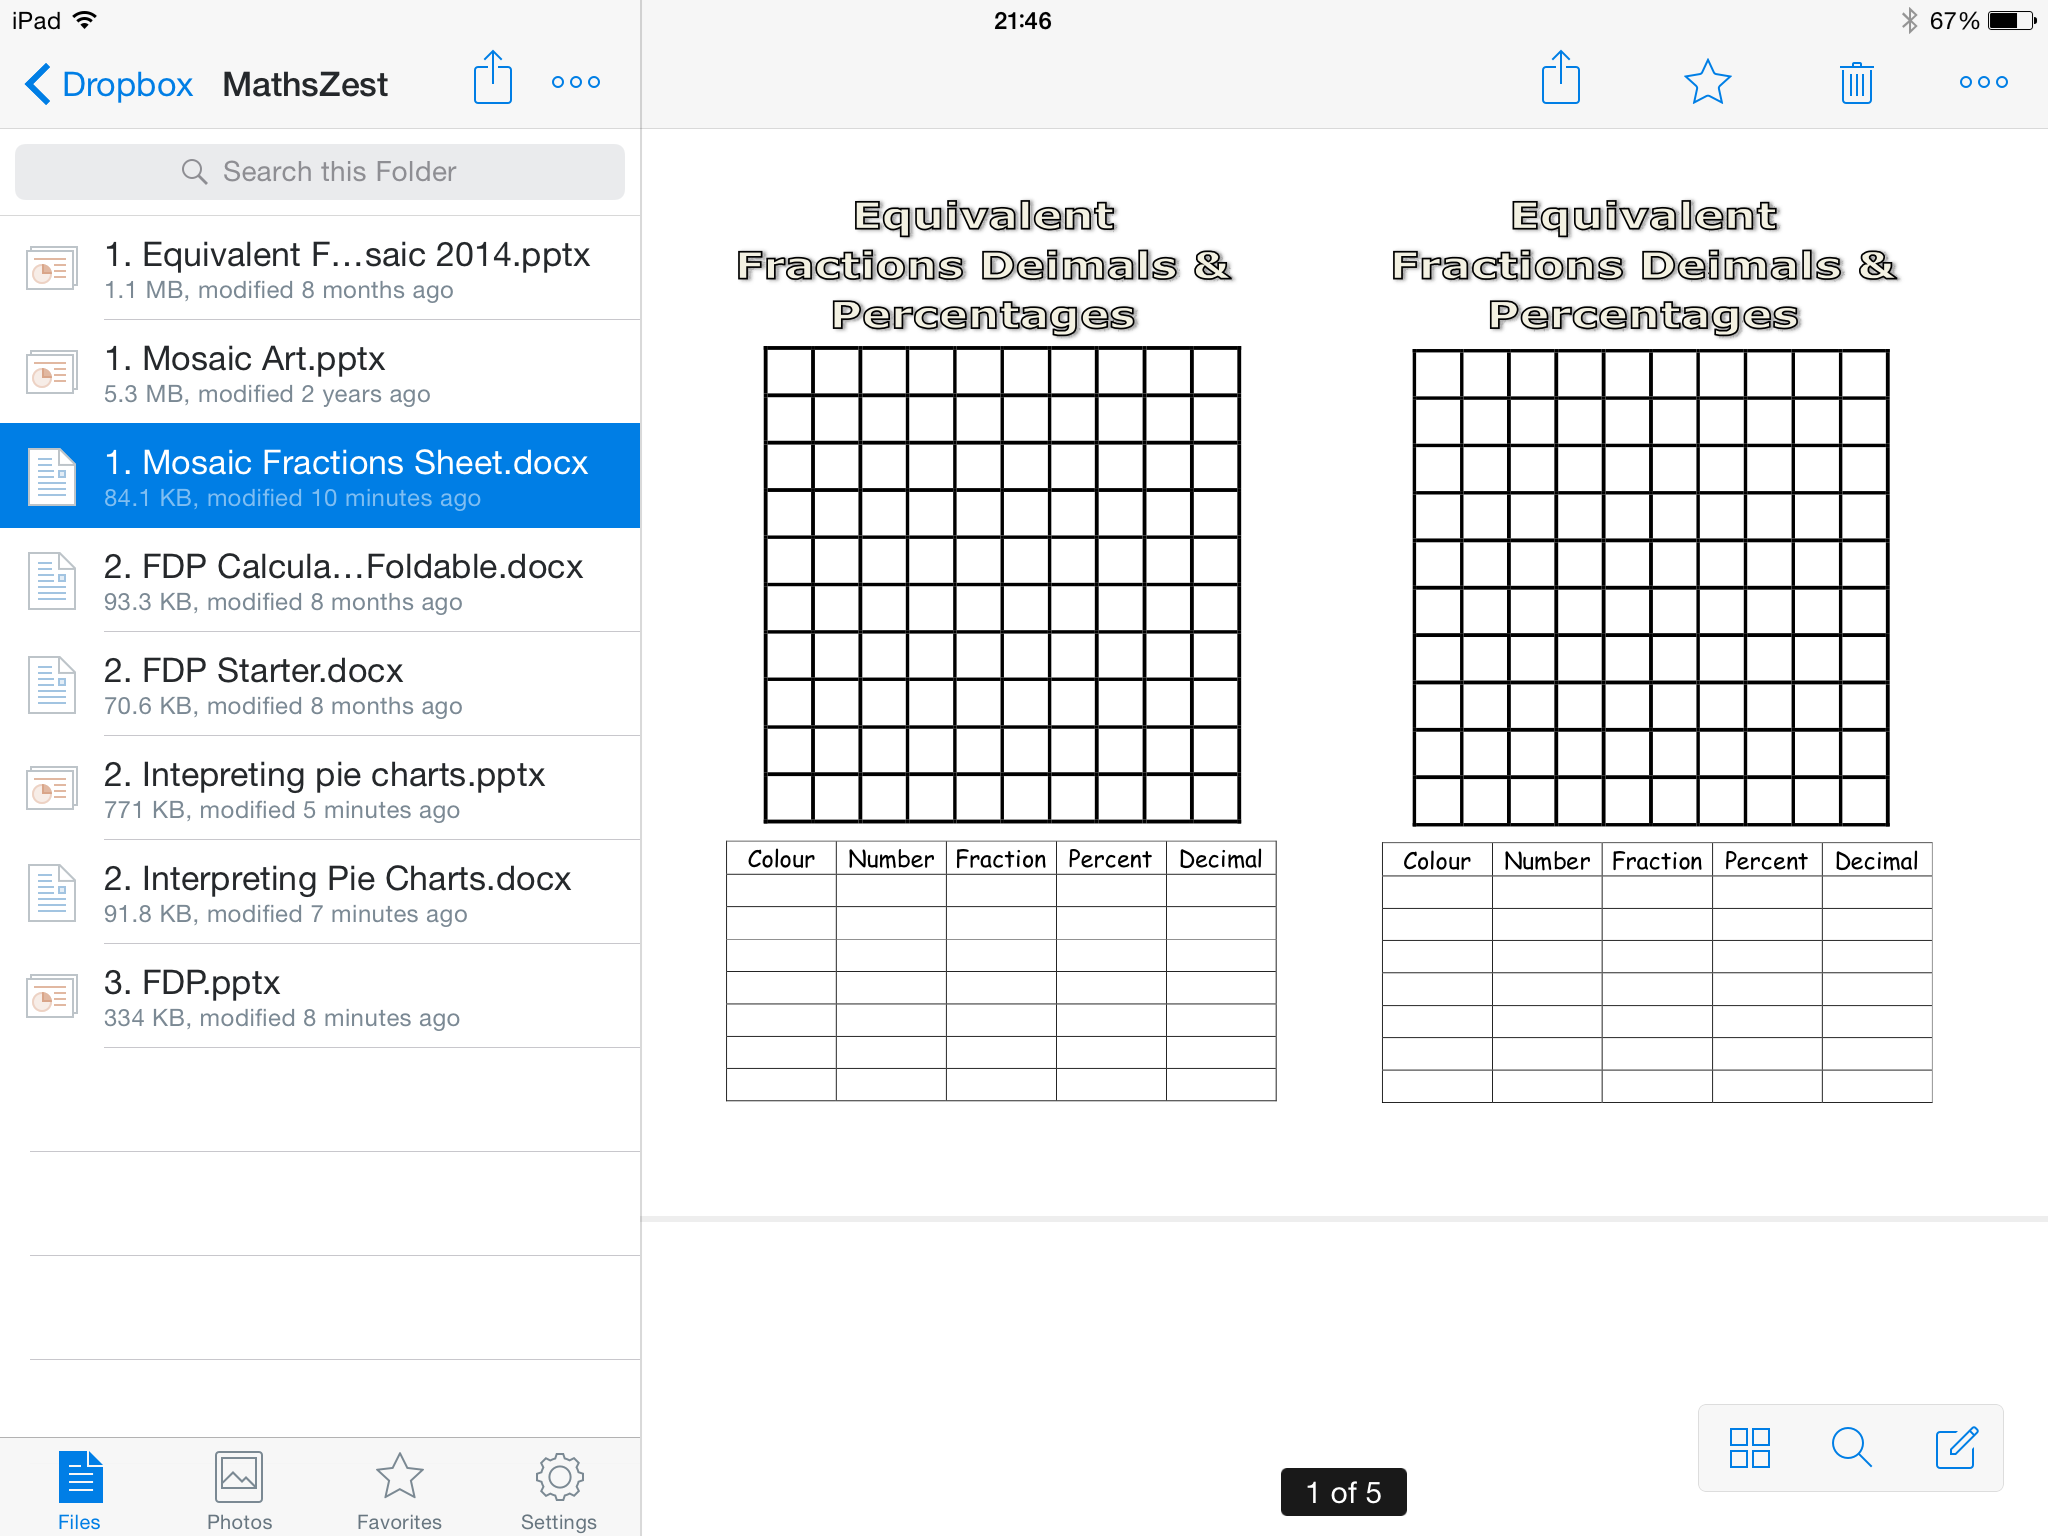
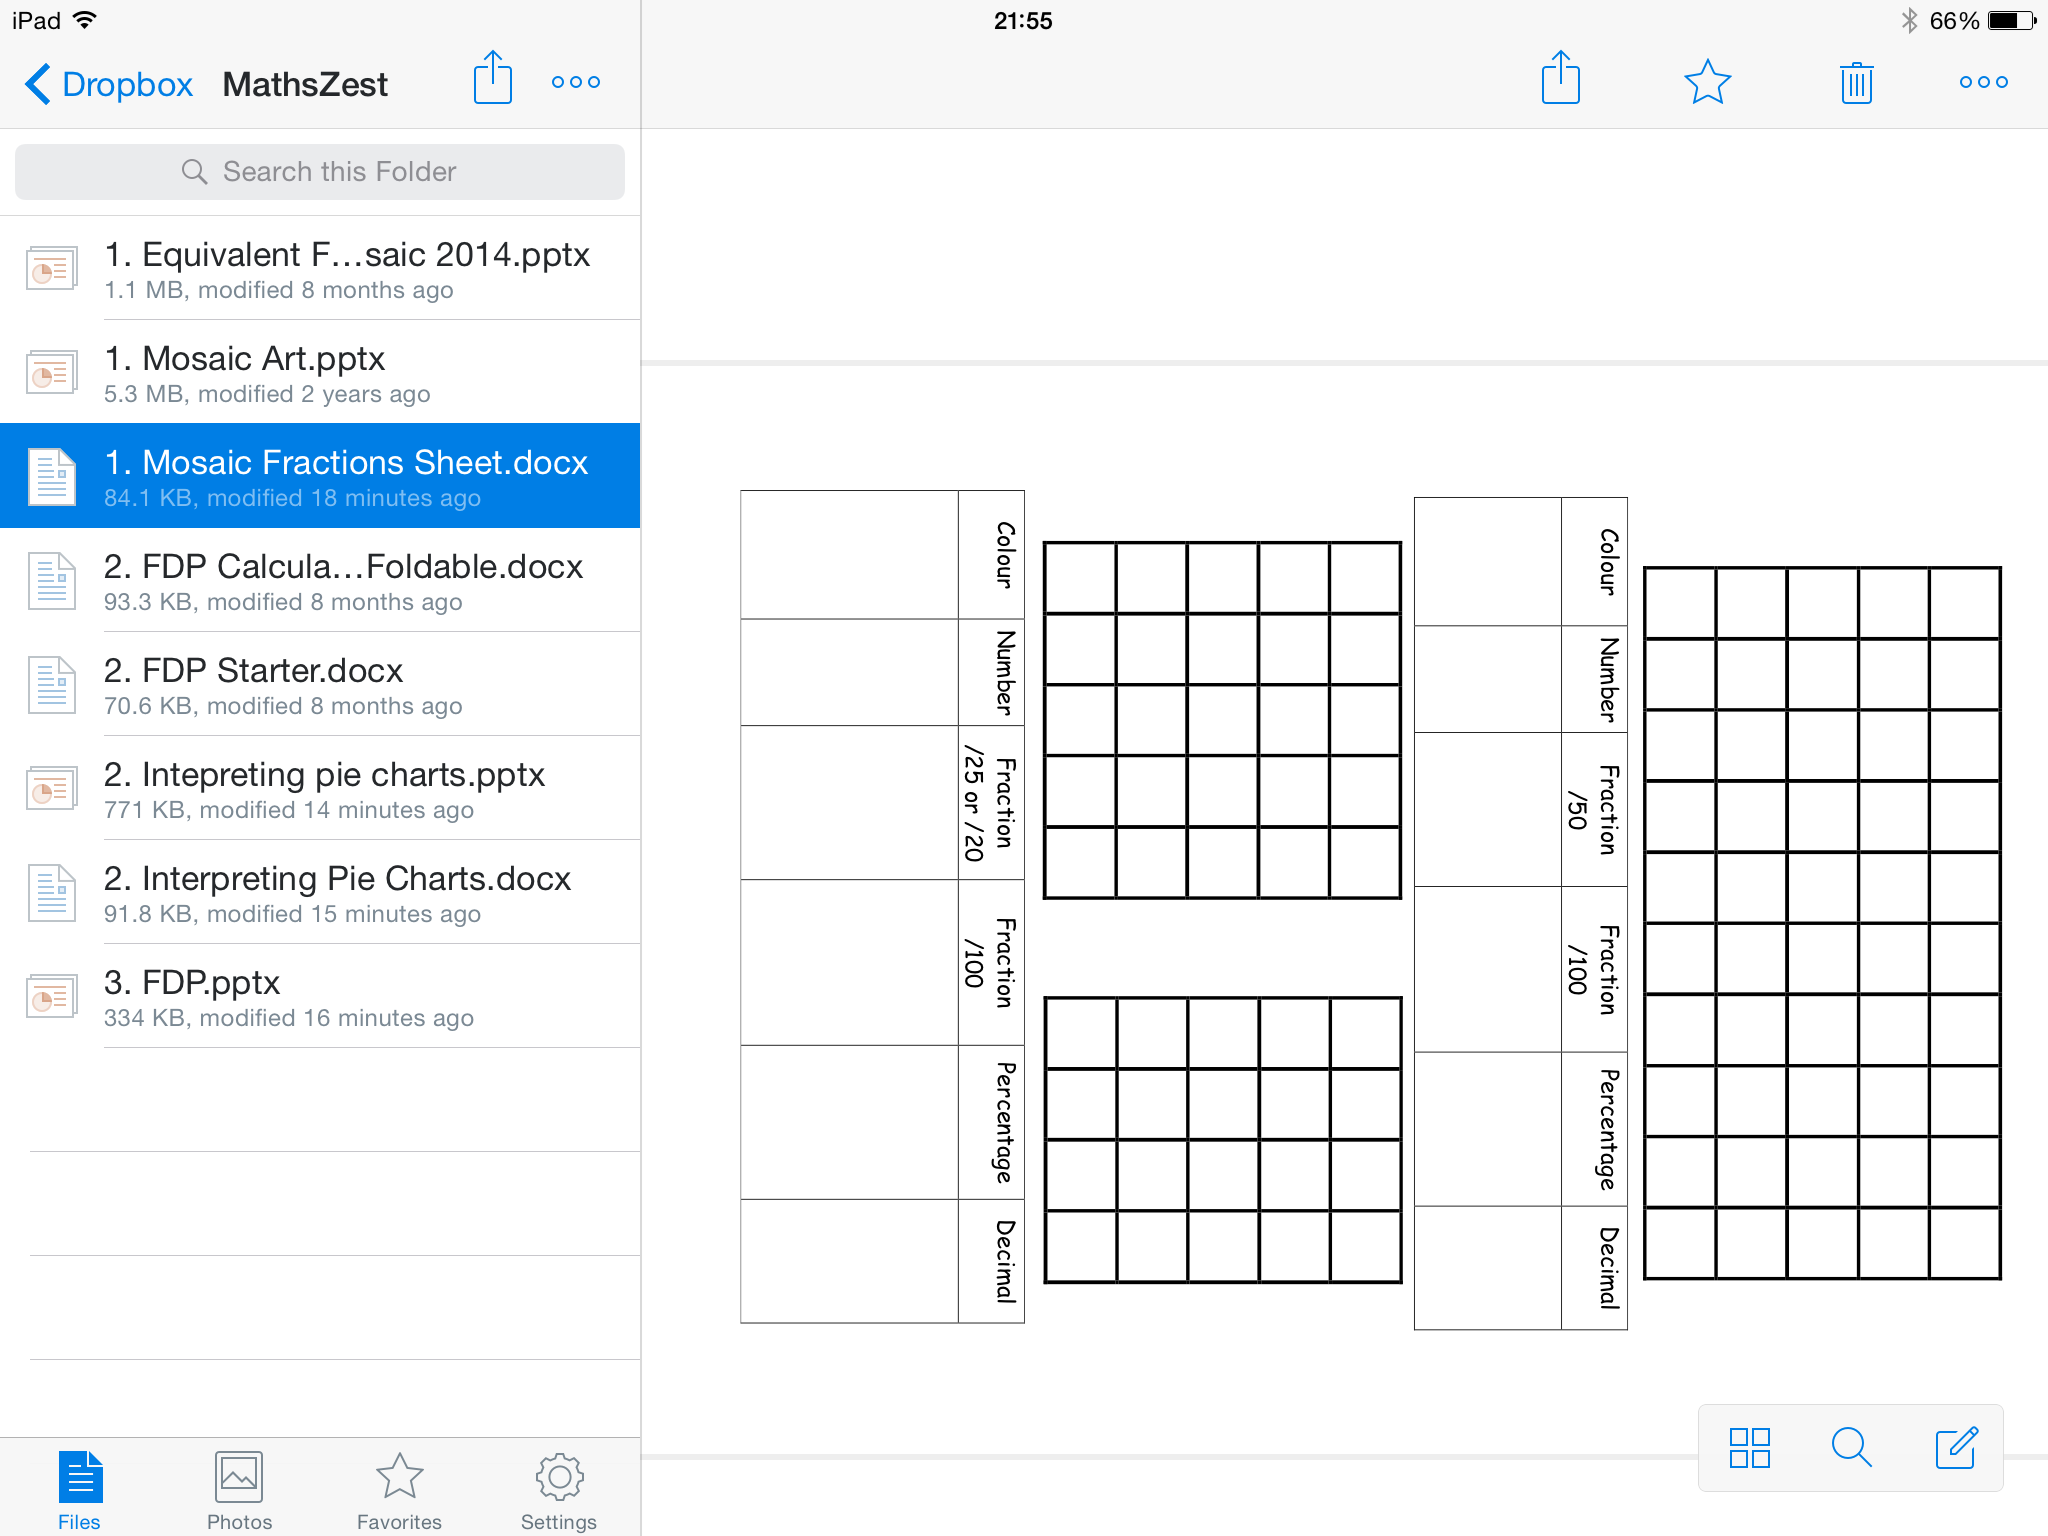
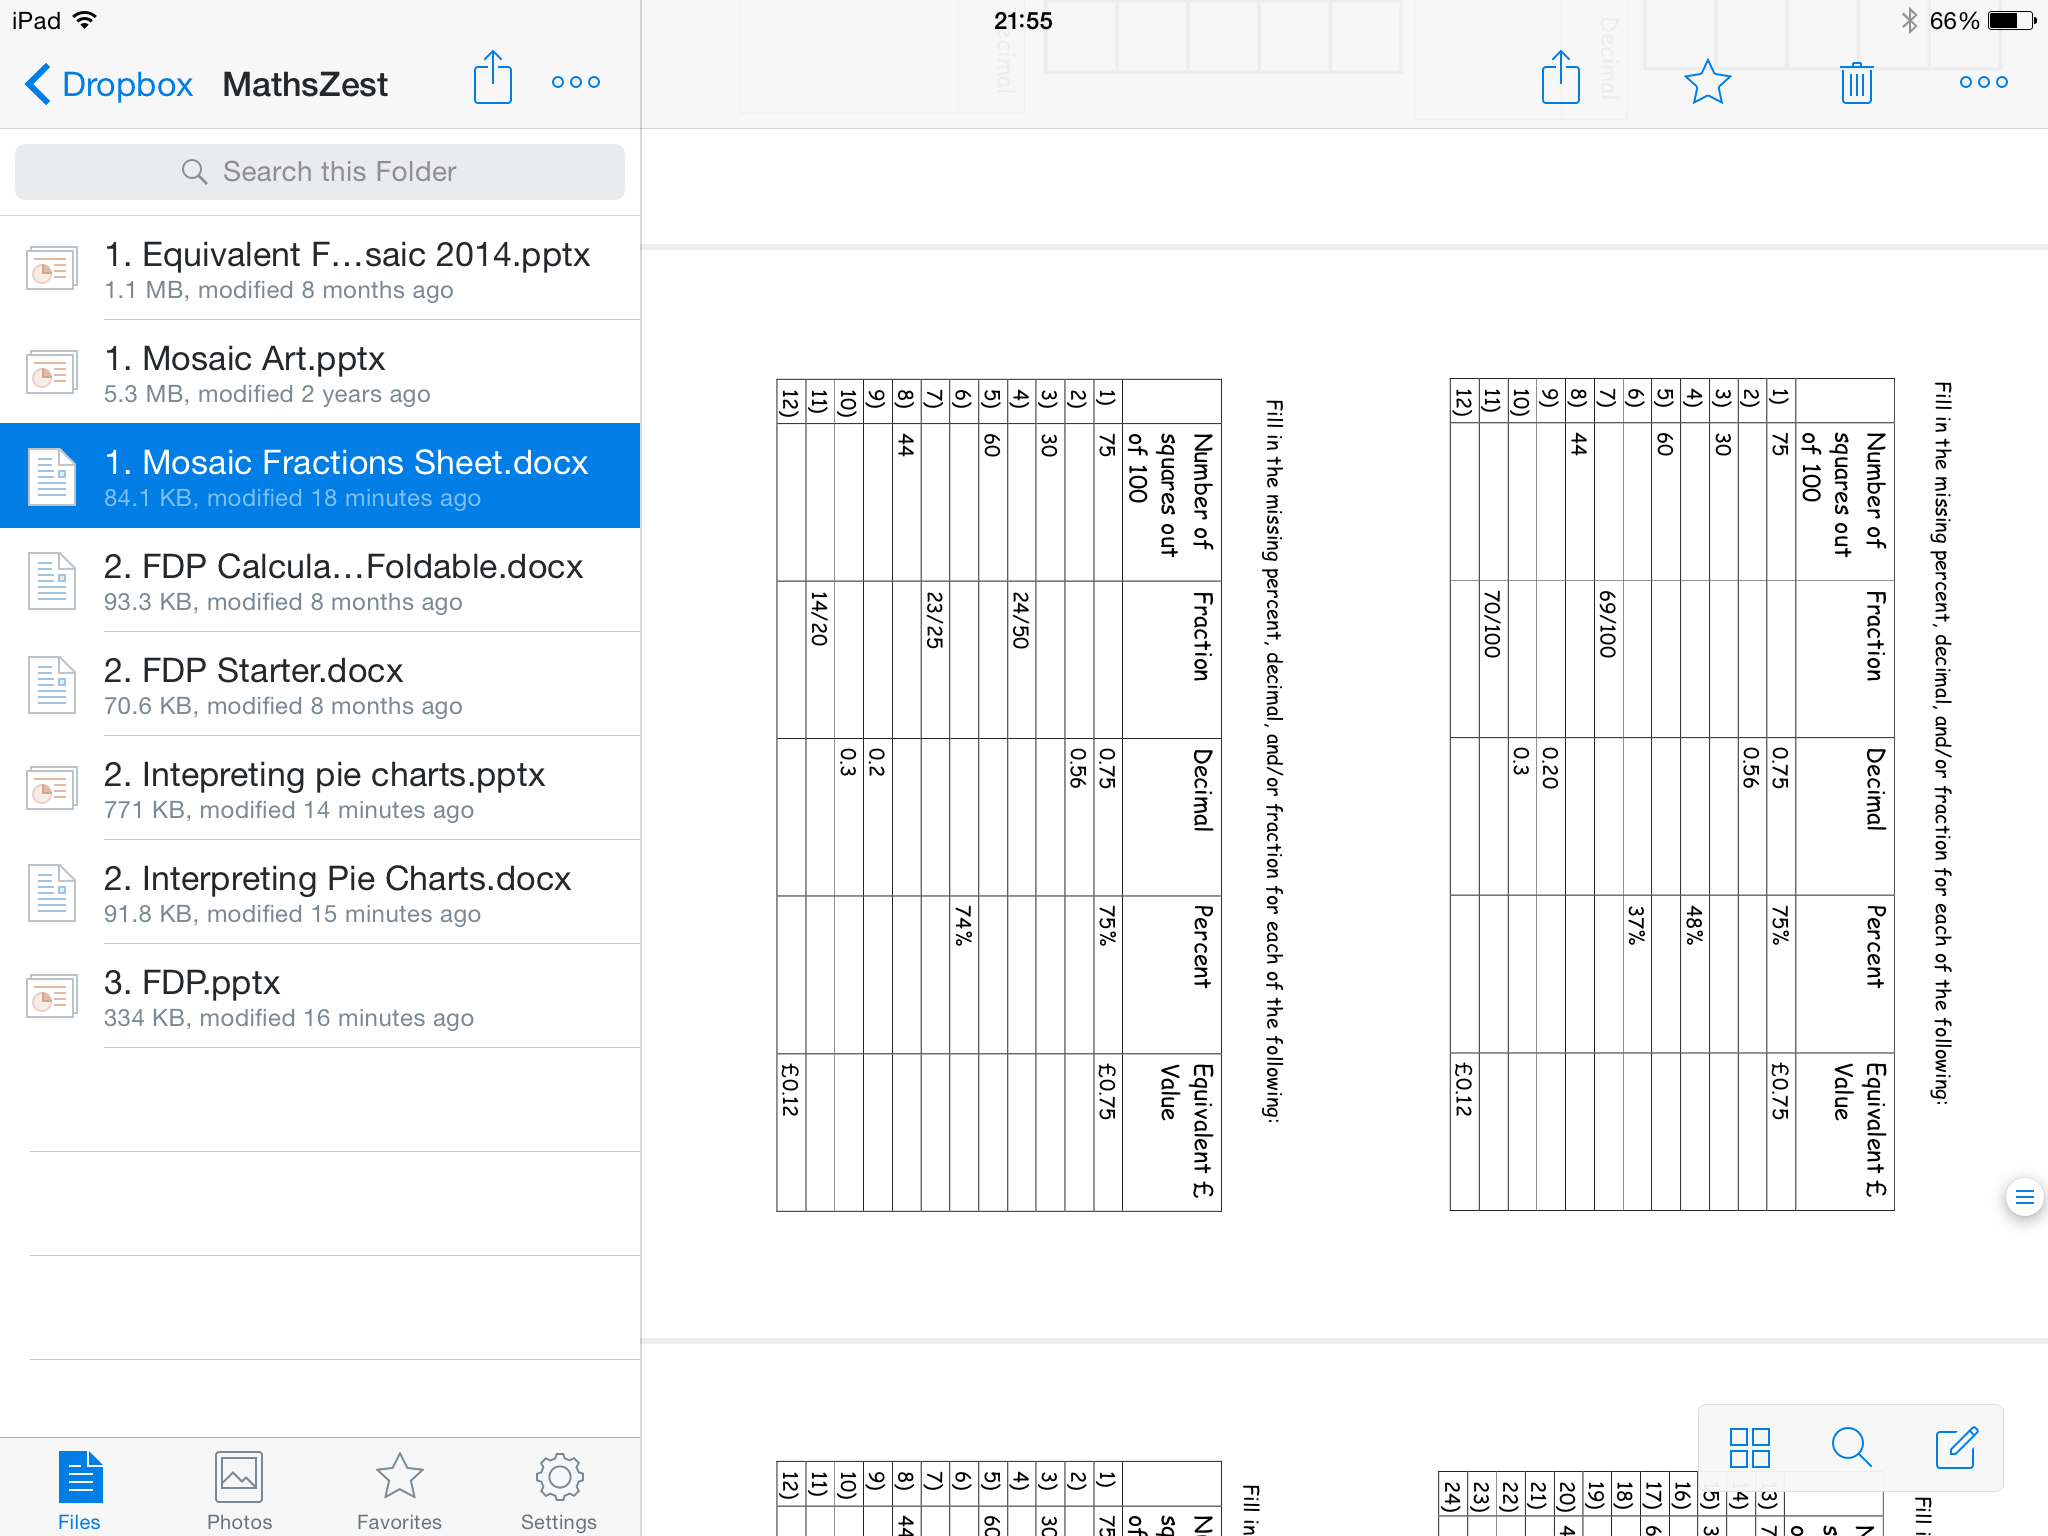
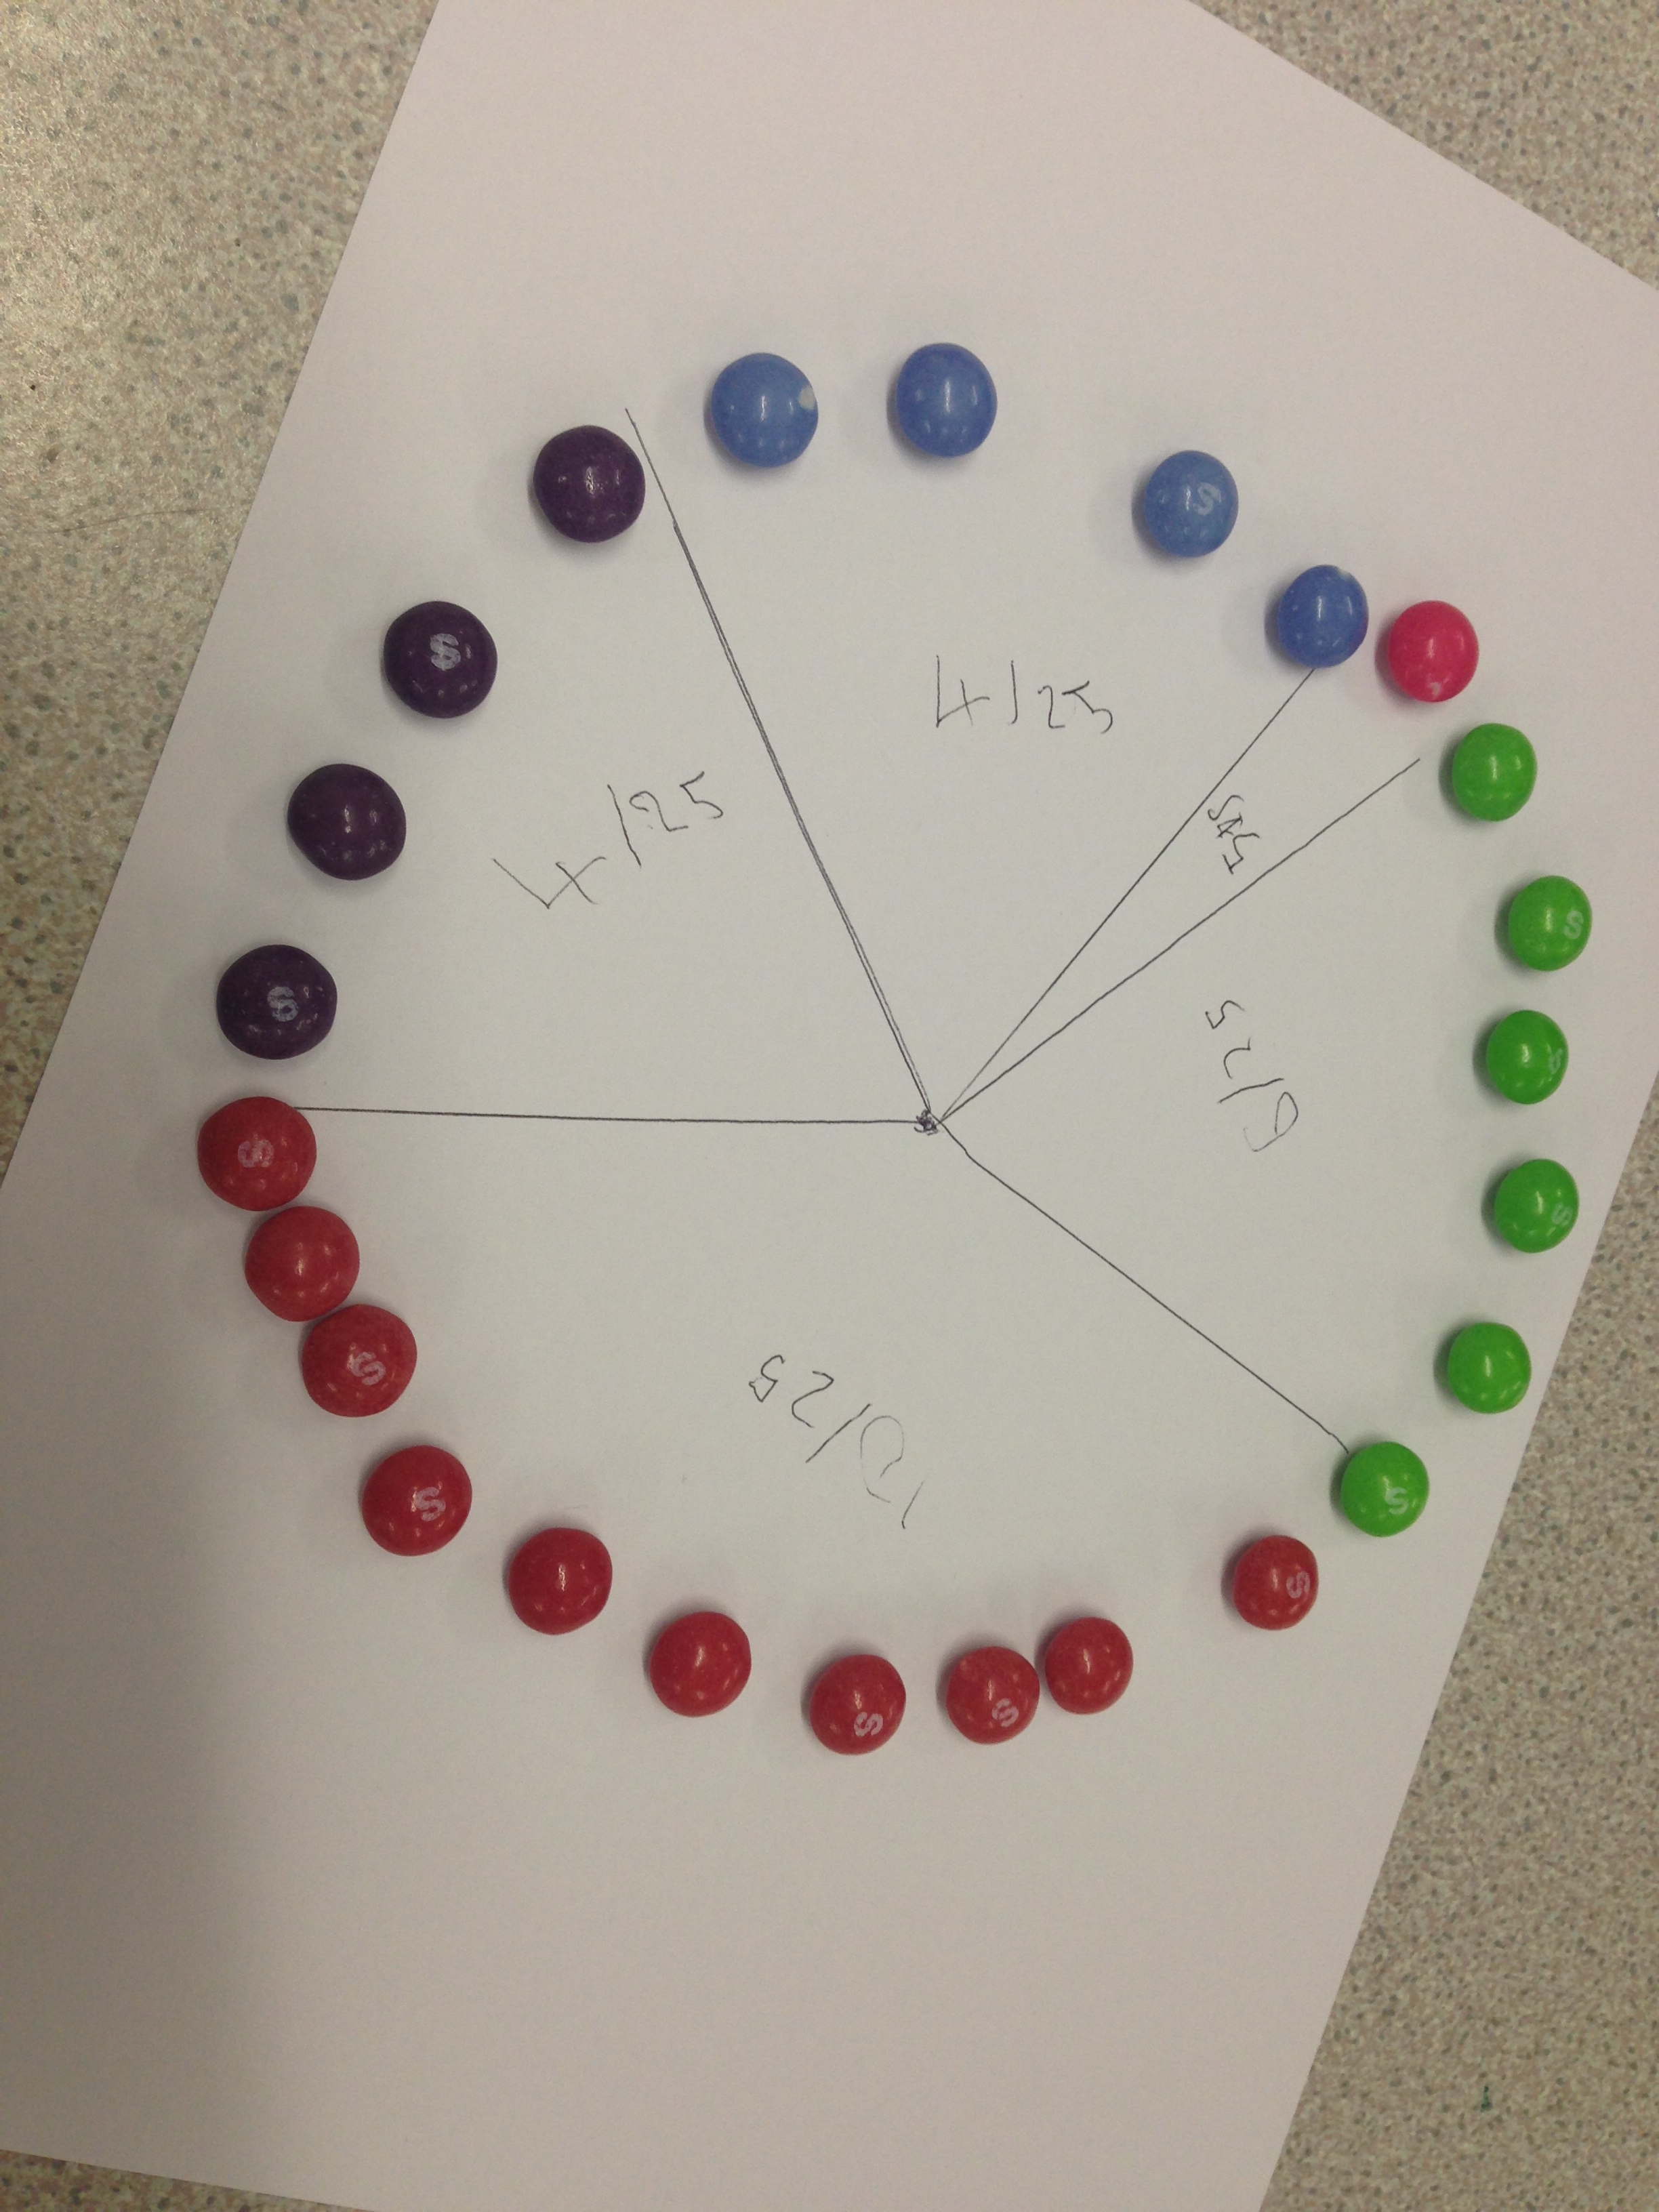
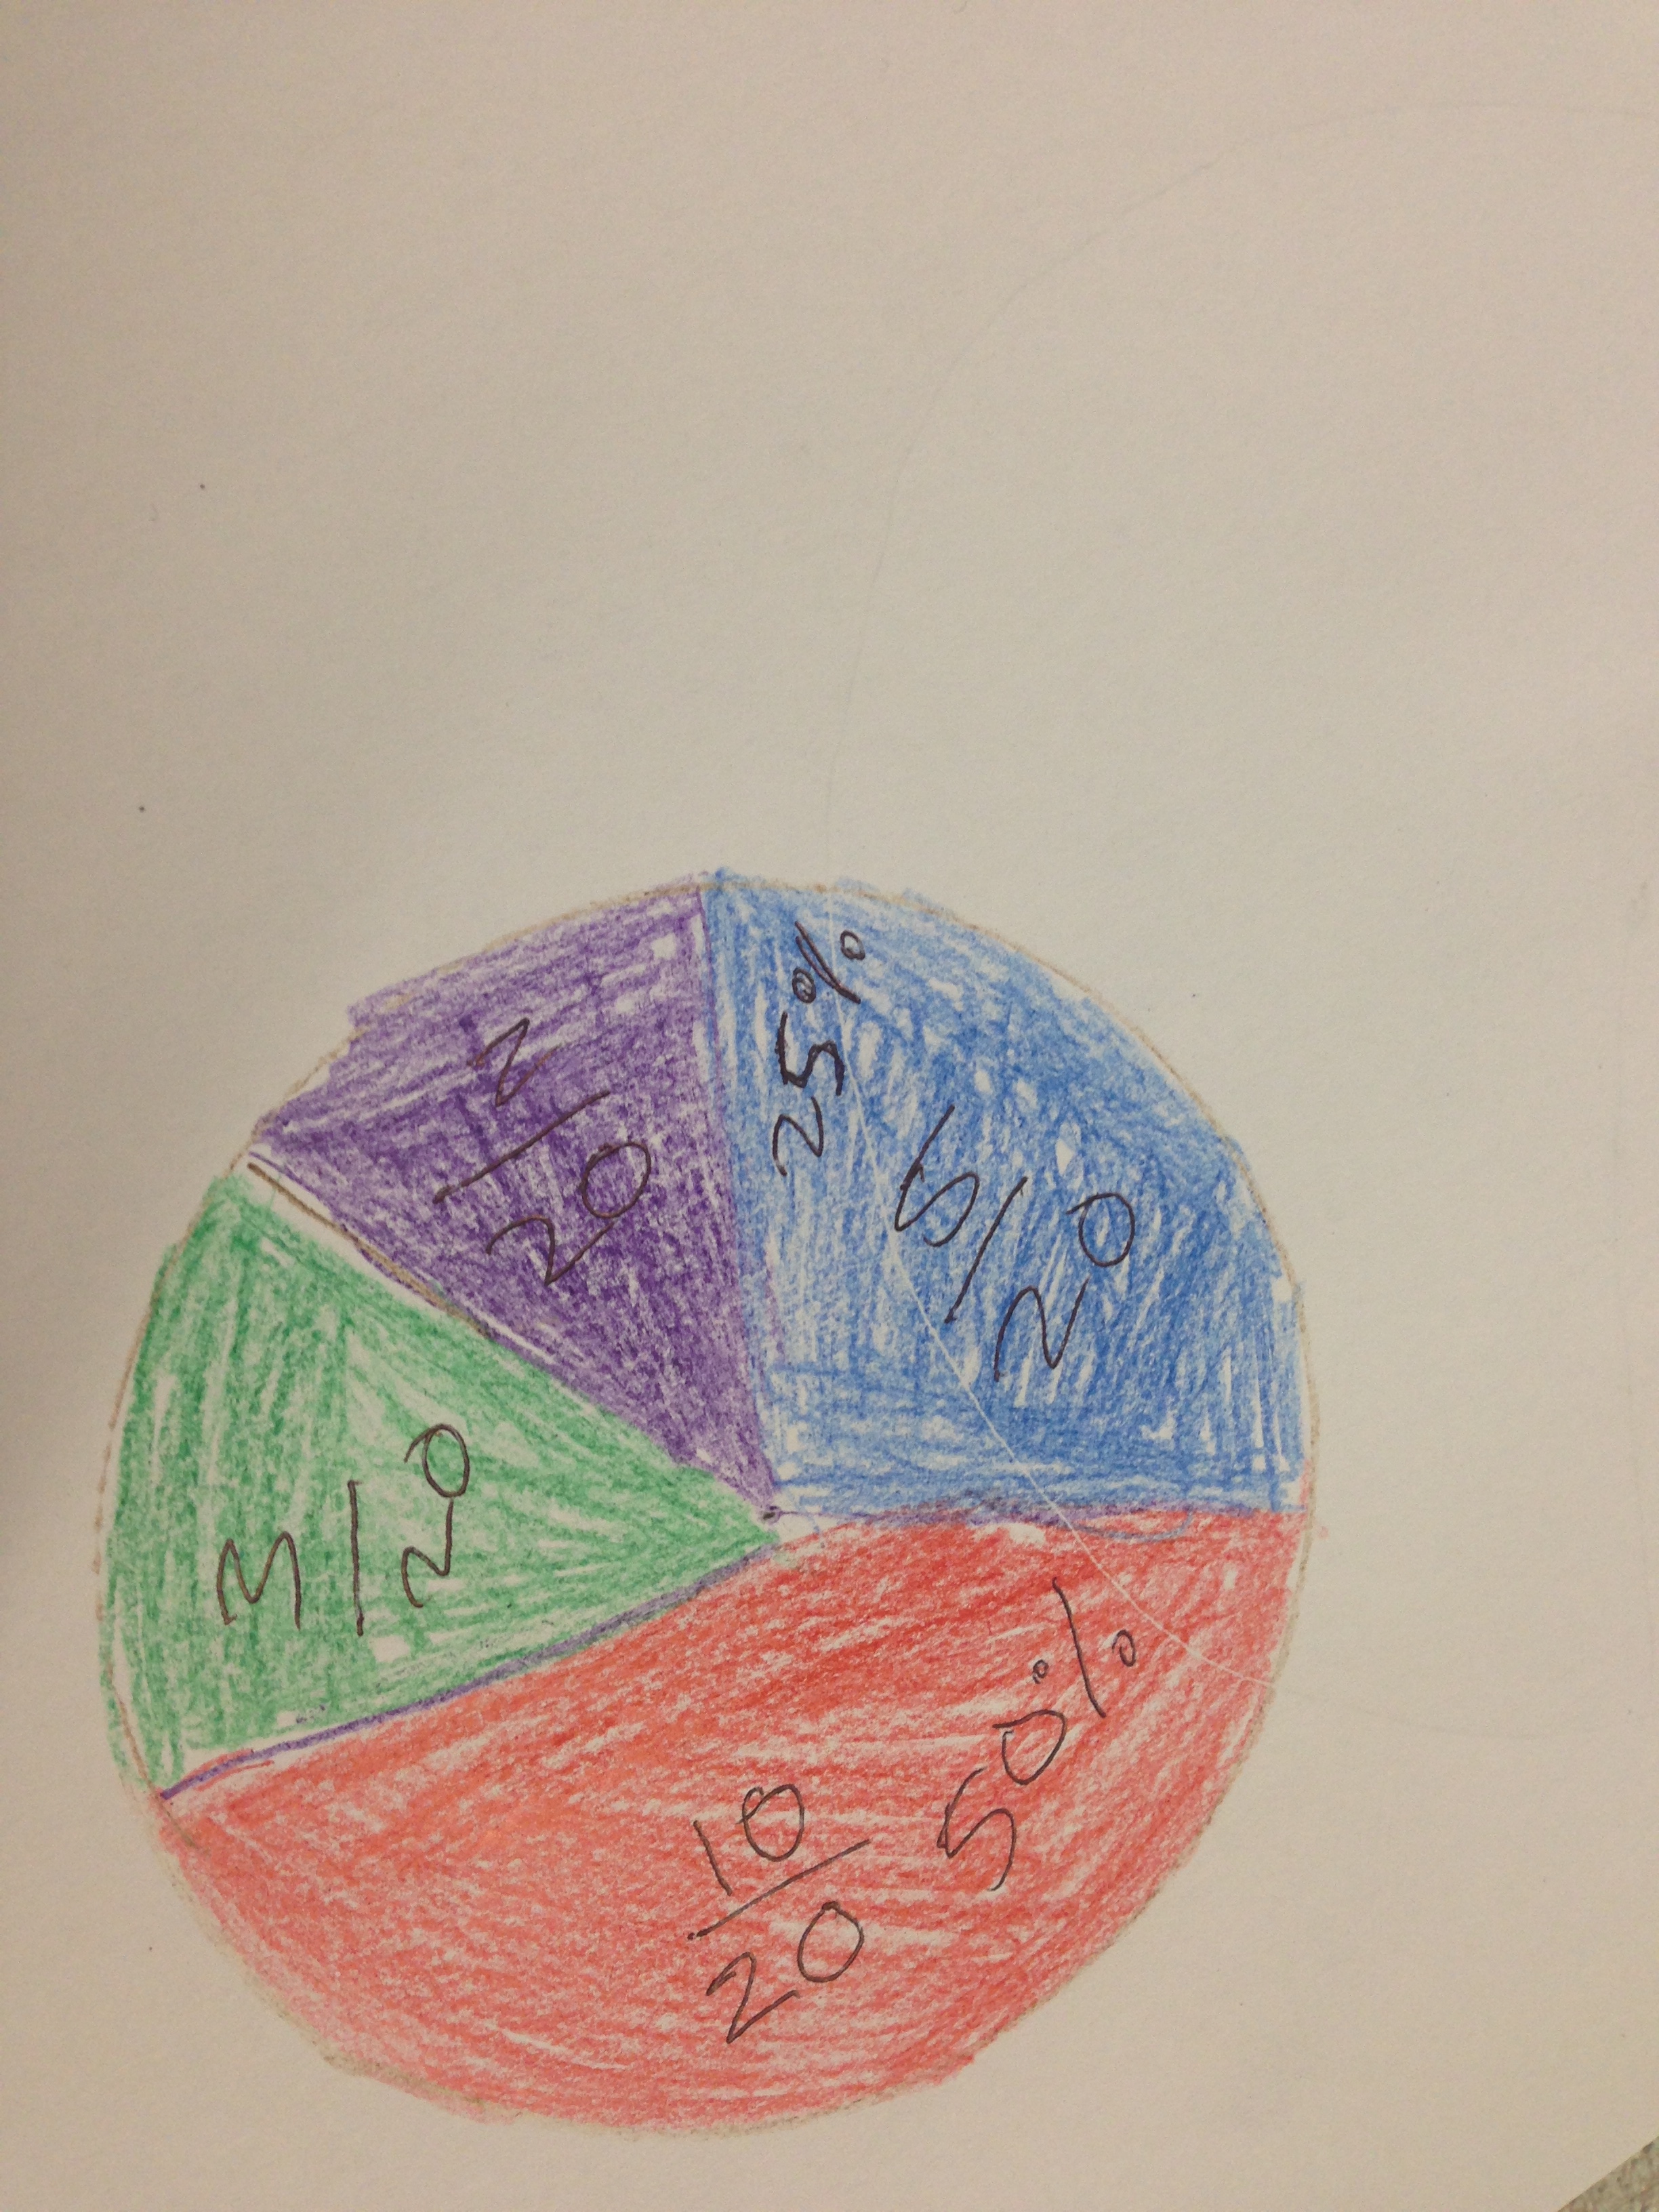
This includes works from Piet Mondrian, Victor Vasarely, Ellsworth Kelly and Frank Stella. With a quick review of what fraction, percentage and decimal (based on a 100 square, so using £s and p to support the decimals) mean, pupils then create their own artwork on their 100 square.  They then use their art work to write the fraction, percentage and decimal of each colour used.   The advantage of using this resource has been to consolidate the connection between the fraction out of 100 to the percentage. IMG_0339 The next step is to move onto a 50 grid, 25 grid, 20 grid and 10 grid, and hence the need to change the fraction to out of 100 in order to write the percentage.   Accompanying the grids are some fraction, percentage and decimal tables, with an extra column for the fraction out of 100, for pupils to practise their conversions. IMG_0342 IMG_0343 A similar resource I’ve used is a skittle pie charts. I’ve done this by giving out skittles (20, 25 or 40) and pupils to make their own circles, grouping the colours, section ing them off and writing the fraction, percentage and decimal for each section. I’ve also given out a template for pupils to colour in given skittles (this was actually to help with interpreting pie charts, but linked in nicely to the fractions, percentages and decimals work the pupils had completed previously. IMG_2292 IMG_2293  IMG_0338 All the files are linked below to use and adapt as wished! 1. Equivalent FDP Mosaic 2014 1. Mosaic Art 1. Mosaic Fractions Sheet 2. FDP Calculation Foldable 2. FDP Starter 2. Interpreting pie charts 2. Interpreting Pie Charts 3. FDP The original idea and basis for these came from TES (complex_number) and an American website, all freely available.  I’ve adapted into my own documents and made them to suit my groups.  Thanks, as always, to the originators of the ideas to sharing so freely, allowing me to use your ideas in teaching my groups.

Presentation for Maths Learning

image

Being an avid reader of @mathsjem’s resourceaholic blog, especially her maths gems, I’m often inspired to try something out.  This time, from gems 30, was the homework expectations. I still get frustrated by pupils lack of presentation skills, despite reminding them of our school’s presentation for learning rules (which are in a bullet point list).  It’s not just following the rules, but the attitude it reflects in their learning, and therefore the expectation of achievement they give themselves.  I hope that if I expect excellence, then pupils can achieve excellence!

So for me to expect excellence in their presentation, I don’t just want a list of rules, but a model to what excellence looks like.  I will start trialling using this model in the next few weeks (with a tweak or two to the design and colours) with the aim of launching it with my classes in September, and a focus on presentation for learning in those first few lessons and home learning.

Presentation for Maths Learning

2nd August: Attached below now is the updated version, which includes presentation target codes for the pupils, as presented by @letsgetmathing at mathsconf4.

Presentation for Maths Learning

Presentation for maths learning

Failing and Sailing

Having read the blog post from Meolscop High School: Shuffling Sums, about First Attempt In Learning and Second Attempt In Learning, and then meeting the lovely @missfilson at mathsconf15 and hearing more about her department’s work on growth mindset, I was inspired to give it a go with students at my school.

The first introduction was with a year 7 group who had been constructing triangles using ASA. I gave them the following problem asking whether students would construct identical triangles if they were gien only angles.

image

Some students were thinking about it straight away and were happy to write down their opinions, but there was a significant amount of students who were reluctant to write anything down because they didn’t know the right answer. It was important to spend time explaining to the students that I was interested in their thoughts and not whether ther answer was right or wrong. At this point I also said that they may want to write a sentence or try constructions to help them come to an answer. For this first attempt, I wrote individual hints in their books to give the students support towards their second attempt. I also wanted to help students feel ok with not getting the right answer the first time, and to share with each other their “FAILs” and hints.

image image

image

image

I also tried this with a year 9 group working through ratio and proportion. Students were gven the miles/km conversion lines and asked to complete any missing values they could. Again, students found it difficult to attempt anything to begin with as they wanted to know the right way to calculate the amounts, but after some encouragement, most students made their first attempt.

image

Looking through students first attempts, they’d all had a go at a valid method, so with support would be able to continue along their line of thinking. This time, instead of giving individual hints, I grouped the feedback into the three methods they’d attempted:

1. Putting values against each step on the double number line

image

2. Recognising where the miles value had doubled, so doing the same to the km

image

3. Finding the relationship from miles to km

image

I reviewed these methods with them as a whole class, and gave them the option of continuing with the method they started with, or changing to a different method. Some results are below (the final student being keen to make corrections corrected her first attempt before rewriting onto the second!)

image image image

From this work, it is evident to me that students find it difficult to grasp the mindset of attempting something without knowing if they are “doing it right”. This won’t change overnight, but the failing and sailing is another step towards developing growth mindset within my maths classroom.

Sharing Good Practice – 100 Outstanding Mathematics Ideas

Once a fortnight in our department we have a spare 10 minute briefing slot, so a couple of years ago, our then TLR holder introduced a teaching and learning briefing session to share good practice. These are usually topic based for upcoming topics! Today’s, however was a feedback on 100 outstanding maths lessons, by Mike Ollerton. A few of us were tasked with reading and trialling out a few ideas.

One colleague had tried out the cuboid and prism volume, a lovely activity of folding a piece of paper length ways into a cuboid (or bigger edged prism) and using the open end on square paper to find the area and then volume.  Another tested out idea was an angles activity, again starting with a piece of paper, following some rules for folding to provide more than 20 angles to work out using angle rules, or to measure.  What’s even better with these is the lack of time needed to prepare resources!

The ideas I tried out included another paper folding activity to help adding fractions with different denominators.  It was a great way of helping pupils understand how to find a common denominator and why, especially with my lower set group.

image

I also tried out partition and product – a number investigation which was easily adapted for a lower set year 9 group and top set year 7 by how much information was given to the pupils to start with.

The final idea I partly used was area of 20cm2, but instead of using area, I found a similar idea using perimeter of 12cm.  It worked really nicely with the year 7s, particularly as I could use the visualiser to display some ideas, which then prompted others to find more interesting shapes.

100 Outstanding Maths Ideas (3 of them)

I would really recommend the book.  It does what it says on the cover: Outstanding Ideas, which come with the bonus of being able to use without time needed to prepare (or photocopy) resources.


Maths Foldables

Something I happened across when searching for a resource was a maths foldable. As I delved deeper, I discovered they’re all the craze in America, along with interactive notebooks. I quite liked the idea of actually making something to provide notes on a topic rather than just writing in the exercise book. My thinking was that these would be particularly useful for younger pupils and lower group pupils, but this week I’ve used one for Yr 11, and they’ve used it really well.

Constructions Foldable

6. Geometry Construction Book Foldable (Print double sided, along long edge).

Yr 11 have been learning the constructions and having found this foldable from ispeakmath and tweaked it, my yr 11s have used it to draw their example construction and then refer back to it when working on the different types of constructions. It worked well with the mathopenref.com site, which enables a slideshow of the constructions to loop round.

Other foldables I’ve attempted so far are the multiplication grid, BIDMAS, transformations, divisibility and rounding.  For the lower groups, having a template seems to have been successful so far, and just having something a bit different in their books as a point of reference for the topics is very useful.

Mult Grid


IMG_2080 IMG_2079

1. BIDMAS Foldable

IMG_2084 RRTE Foldable

IMG_2083 5. Divisibility foldable

IMG_2082 5. Rounding inc sig figs

Just wanted to add at the end, that making these quick reference tools follows investigation and discussion; they’re not just a write and do tool!